Setting Up VHF receiver for air-traffic communication
Obviously one needs to have the voice recordings in order to be able to do the conversion and this will be the focus of this blog post - we’ll take a look at how to set a VHF (very high frequency) receiver. Luckily it is really simple and a person interested in eavesdropping to pilot-controller dialogue does not have to be an expert in radio equipment.
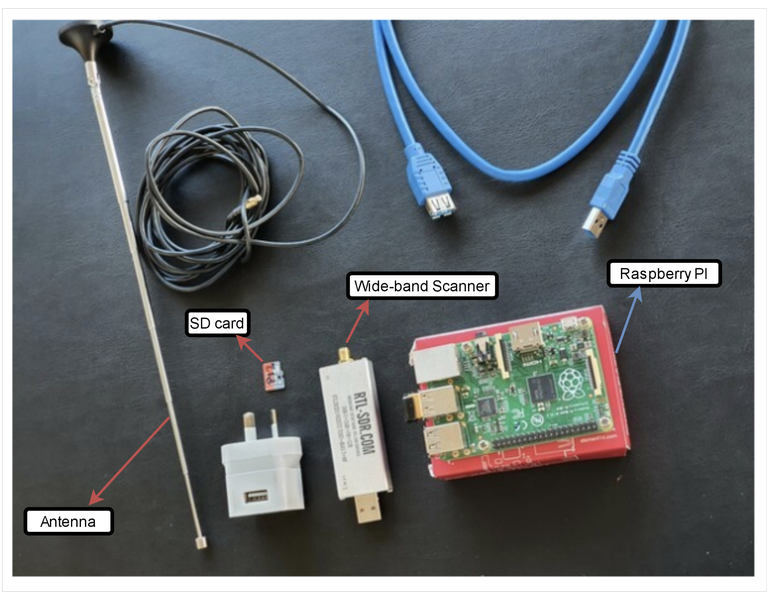
So, what is needed to get started?
- A Raspberry Pi (RPI)
- USB power supply for the RPI
- LAN cable (for initial set-up)
- MicroSD card
- One or more RTLSDR USB sticks
- An antenna
These things will make set-up easier:
- USB extension cables for the SDR USB sticks
- Monitor and keyboard if you want to set-up the RPI without LAN cable
Setting up Raspberry Pi
The first step to get started is to set up the Raspberry PI, a versatile single-board computer that can be used for developing pretty much anything.
More about the Raspberry Pi project can be found here: https://www.raspberrypi.org/
As the Raspberry Pi project has produced really easy to follow instructions on their homepage, we are not going to give exhaustive instructions here. Instead we’ll guide people to here: https://projects.raspberrypi.org/en/projects/raspberry-pi-setting-up
Installing the ATC software
Alright, hopefully by now you have a Raspberry Pi ready to be used. Next, software to enable radio signal reception needs to be installed. The following is based on the instructions given here: https://atco.opensky-network.org/
The software is based on RTLSDR-Airband. It’s beautifully crafted open source software that can be found here: https://github.com/szpajder/RTLSDR-Airband/
It pretty much has three main parts in it:
- Set up Raspberry Pi. As we described it earlier, you do not do anything here
- Install RTL-SDR Airband software and all required utilities. We have made an effort to automate this step so all you need to do is to execute a few commands on your Raspberry Pi terminal window.
- Modify the RTL-SDR Airband config file. We have created some functions that will help you along the way.
(I live in Tallinn, Estonia so the following examples are based on that.And although you can have more than one receiver dongle attached to your Raspberry Pi, the following example assume only one)
a. Hit “Add New” button and hit to confirm your choices

(Note the comments explaining some of the choices you need to make. You can have more than 1 one receiver dongle per your Raspberry Pi)
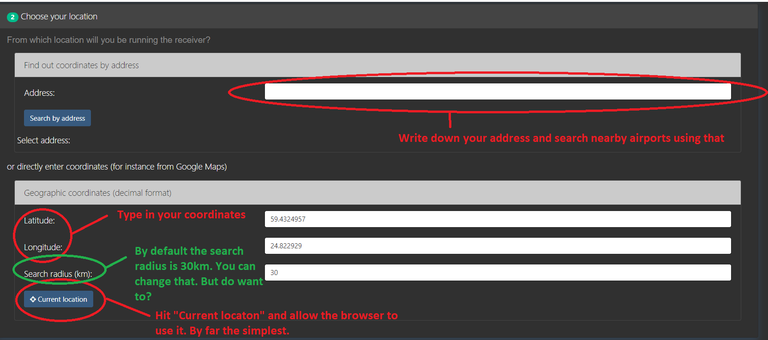
b. Specify parameters related to the receiver location

(It will be used for proposing frequencies you could listen to by searching airports that are close to your location. Pick one method to localize yourself.)
c. Choose an airport of whose communication you would like to listen to

(Normally you would not one want to pick one that is further than 10km or so. But in some cases it would be of interest. For example, when you're directly underneath the descend route and would like to eavesdrop pilots’ talk. In this case you’ll probably have a bad reception of the controller's voice).
d. Choose the frequencies you would like to record.

(You basically can choose to listen to more than one frequency. BUT if the difference between the frequencies is greater than the one you specified in step “a)” then an error message will be given. It looks something like that: “Bandwidth of device 0 - My New VHF Receiver exhausted! Used bandwidth 7.300000000000011 - available 2.4”
If you see something like that, then just reselect frequencies that you want to follow and consider using multiple SDR dongles)
e. Place the config file to the right place

After you download the configuration file, place it to the right folder and restart the device, the receiver will start to record the communication taking place on the frequency. By default The audio files will be created to "/home/pi/output_airband"
You can make whichever modifications to the configuration file. The instructions can be found here: https://github.com/szpajder/RTLSDR-Airband/wiki
f. Hear the skies with your new VHF receiver
In this instance, you probably have set up both, hardware and software. Now, it is time to start hearing what’s in the sky. Firstly, you need to open a terminal and type “rtl_airband -ef”. After some time, you’ll see in the terminal, the frequencies that your receiver is “hearing” and when you see “*” that means that the recording system has been activated and an output file is going to be created.
After some time, you could check the following folder → ~./output_airband/ to see the segmented files in “cs.16” format, accompanied by a “cs16.info” file, which shows some key information.
And that’s it. I hope you enjoy following what’s going on in the skies above you. And don’t forget to contact any of the project members should you have any comments.

